Since these are from the scrap bin, I needed to be sure my strip lengths surpassed 17" when I needed to cut the larger QSTs (quarter-square-triangles), and surpassed 6" if I only needed to cut HSTs (half-square-triangles). Pictures to some shortly explaining these requirements.
Creating the Strip-Sets
 Sew two blue strips, one to each side of a white strip. Press towards the blue. Repeat using two red strips and one white. Press towards the red.
 I used the Easy Angle ruler (for HSTs) and the Companion ruler (for QSTs). The Easy Angle ruler I have is the smaller 4.5" version, so I needed to eyeball up a small part of the cut. Notice the location of the upper "notch".
 To note: When I was playing the other day with intentions of only using the Companion ruler, I didn't want these corner ends to be wasted; that's why the Easy Angle ruler was used, which led to the creation of the secondary block in this quilt.
Once the HST is cut with the Easy Angle ruler, switch over to the Companion ruler for the QST cuts.
 As you near the end of your strip set, again you will be using the Easy Angle ruler to cut off the "ending" HST unit. Again, notice the placement of the "notch". If you have a larger Easy Angle ruler, you'll simply be able to line up normally with (roughly) the 5" mark.
 Now....HERE is part of the minimum length requirement business. From a 17" strip set, you will be able to cut two (2) HST units and two (2) QST units.
  I TRIED shorter strip sets where I was only able to get one (1) QST unit, thinking...."no biggy! I'll just cut the extra down to HSTs." {{see where the QST was cut?}} Well folks......this creates a mirror-image HST, which simply didn't work with the rest of the HSTs.
  No matter which way I turned the "mirror" HST, it didn't work. Now, by all means, if you plan to cut a bunch of "mirror" HSTs, then maybe you'll play around and get something to work. But from this point on, I only cut EVEN numbers of QSTs from each strip set.
  If I didn't have enough left in the stripset for an EVEN number of QSTs, I grabbed the Easy Angle to cut as many HSTs as I could from the remaining set.
 The absolute shortest strip-set I used was at least 6" which allowed me to cut two (2) HST units, so don't rule everything out if it's less than 17" in length.
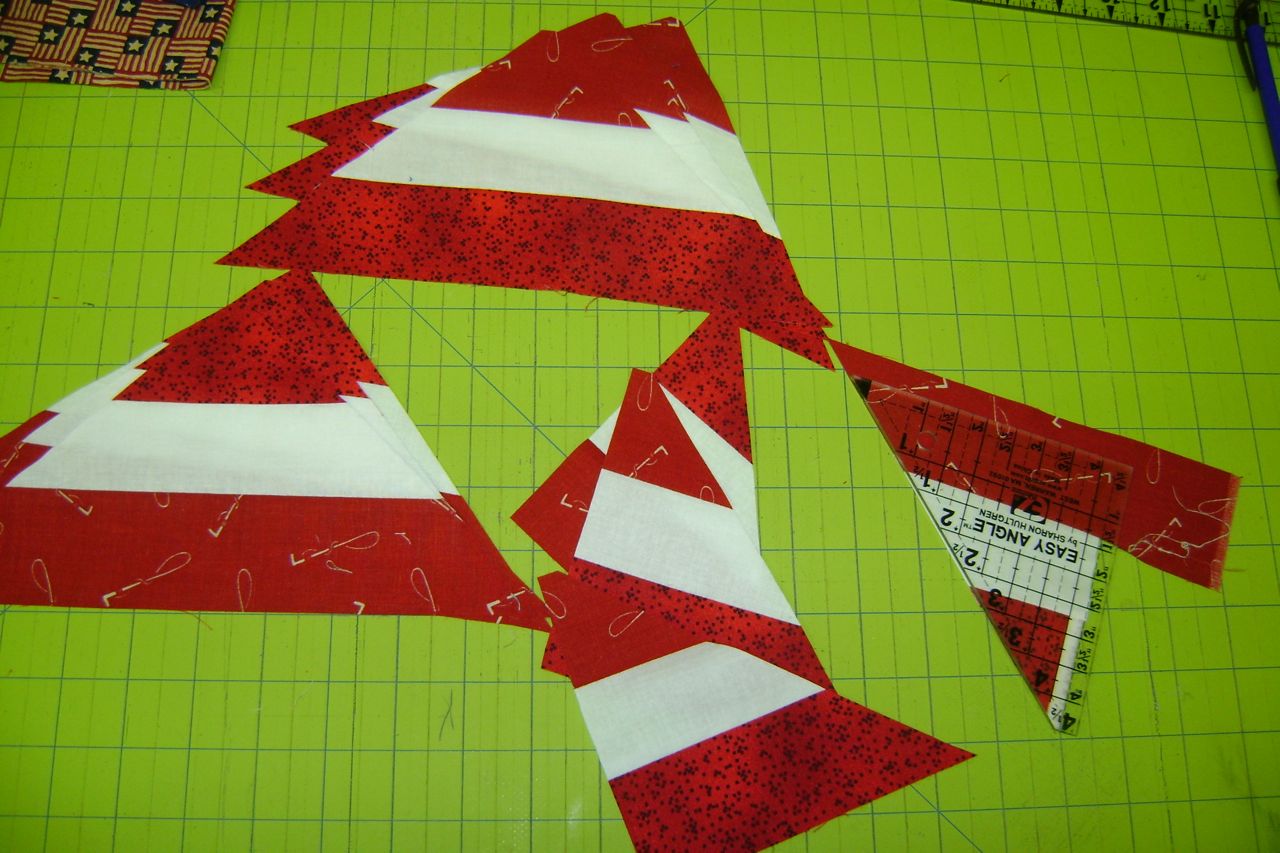 On the other extreme; if you use a full WOF strip set, you should be able to get six (6) QST cuts and three (3) {{MAYBE 4}} HST cuts. Notice that I was JUST shy of getting a 4th HST from this strip set.
Number of units needed
 The 5x7 layout I made needed the following units:
- HST units (Easy Angle ruler cut) needed: 36 each in red & blue
- QST units (Companion ruler cut) needed: 34 each in red & blue
In addition, you will need to cut the following from your white...
- 2" x 6.5" rectangles: 36
- 2" x 9.5" rectangles: 36
 Starting with the QST units, I set all 34 reds and blues as pictured and chain-sewed the entire stack. Once finished; I pressed towards the blue units.
 Then I split the pile in half (as pictured) and chain-sewed these into the 17 "hourglass" blocks. Press and trim (as needed) to 9.5".
 Then came time to chain-sew the 36 HST units. I set all reds and blues as pictured and sewed through the entire stack. I pressed towards the blue units.
 Split the pile in half (as pictured) and chain-sew these into the 18 "bordered-pinwheel" blocks. Press and trim to 6.5".
 Using my Easy Square Jr. made easy-n-quick work of trimming. The center 45 degree lines should match up quite nicely with the seams in the block for you. I trimmed on two sides, then rotated the block to trim the other two sides.
 Using the 2"x6.5" rectangle units, attach one to each side of the 6.5" pinwheel blocks. Press towards the white border units.
 Using the 2"x9.5" rectangle units, attach one to each the top/bottom of the pinwheel blocks, pressing again to the white border units.
 I choose to create a 5x7 layout, alternating the blocks so that each corner consisted of a lighter "bordered pinwheel" block. I also took care to make sure my hourglass blocks alternated row-to-row to create these larger blue and red "on-point-looking" diagonal squares (diamonds).
  For the inner border, I cut 2" strips of this checkered red/white fabric. First cutting and piecing lengths for the sides, and then again for the top/bottom. If sewn perfectly without any stretch, the two sides should measure 2"x63.5", and the top/bottom should be 2"x49.5".
  The final outer border I added was of some Americana fabrics; and hindsight is screaming at me...."TOOOOO BUSY!" But, the borders are cut and sewn and won't be coming off. The fabric was cut about 6.5" both along the length and WOF in order to keep the directional aspect of the fabric. My final quilt top measures 61" x 78".
 This quilt has Alycia's name on it for her QOV projects!
4 comments:
very nice AMY! I read though your direction and think i might take a try at this, I have a ton of scraps and have been thinking I need to spend some time using them up! great tutorial. cw
Thank you SO much for writing this out - I am printing it off to start gathering my fabrics!
Thanks for the great instructions. This quilt turned out great! You might think the border is too busy but I think it's just right! This gives me some inspiration to do something with my red,white and blue scrap strips. Thanks so much for writing these out, your instructions are always so easy to follow!
Great buys from Joann's and I have that book and it is a good one. Look at the Bull's Eye quilt in it. It was a favorite pattern here in the Dallas area for several years. It's a fun one to do and use up your scraps. It goes quick and has frayed edges. I made several years ago and gave to our Covers for Kids...you will like it, trust me! I hope you have fun while the girls are at VBS!
I have to say it again, I love this so much.
Post a Comment