Saturday, July 25, 2015

Crochet washcloths and County Fair Grand Champion

This past week, I've been focusing on some crochet projects with hopes to add a little more variety to my MIL's fall craft sales.  The washcloths have been piling up nicely, seeing the temperatures and humidity have been slowly rising these past few days.

Monday morning, I visited a local Bookstore/Yarn shop, looking for some "Made in the USA" cotton yarn.  JACKPOT!  This Cestari "Old Dominion Collection" yarn caught my eye; the price was reasonable at $8.99/100g hank.  Only two hanks were purchased..... and by the end of the day, both had been crocheted up into some 8" and 10" washcloths.  Therefore, on Tuesday, after eye appointments in the afternoon, I stopped back in to the shop in order to pick up a couple more colors ;)

I primarily used a simple hdc shell stitch pattern [Ravelry link] for most of the washcloths.  But by day four, it was getting old, so I went back to my simple sc/dc alternate pattern.

While searching, this Simple Soap Saver pattern [Ravelry link] also intrigued me, so I gave it a quick whirl.
  
A few other washcloths using Knit Pick's Dishie yarn were also stitched up.

Sometime along the way, the currants and gooseberries were picked and jammed up.

And the past couple of days have been consumed a bit with the County Fair.  Exciting news for Cassie and our Steve -- they earned Grand Champion Cock (Rooster)!  She's tickled pink!

Wednesday, July 15, 2015

A gardening post... and Celtic Solstice ;)

We're well into July of 2015, and I really haven't posted much of my garden-in-action this year.

The upper garden only saw a minor walk-through today since we've spent the past week focusing on it.
The lower garden, however, saw lots of action today in-between running to-n-from school to either pickup or drop-off one child or another (that was a LOT of hyphens!)  7:00, 8:00, (no 9:00 today -- she biked home), 12:30, 2:00.  4.9 miles away... it's a lot of to-n-fro, but...

  • the plot of white potatoes were hilled up and weeded
  • onions freshly weeded
  • small row of tomatoes weeded and mulched (grass)
  • the corn was fertilized with nitrogen
  • the strawberry patch fencing was taken down, rolled up (I have a feeling it'll come in use again once the tomatoes start ripening--those silly chickens!)
  • the strawberry patch was thinned/tilled from 3 ginormously wide rows (plus the new one) into 6 thinner rows (plus the new one). 
  • raspberry rows were mostly picked;  we're starting to get tuckered out, so we're finally calling it a day

With the capability of pantograph photography, both of our gardens can be caught each in their own single snapshot.

Upper garden...

Back left corner:  lettuce, kale, chives, asparagus -n- the like...
Large plot of cabbage and broccoli right in front by the door
rows of carrots, kohlrabi, peas, basil, more lettuce
some rogue dill and parsley
berry bushes (currant, gooseberry, and two other varieties that Paul picked out)
tomatoes, tomatoes, tomatoes (in the background)

... and up close ;)

Lower garden...
the raspberry patch
the strawberry patch
red potato patch (mulched in grass)
rows of corn
dead spot -- nothing
more corn
white potato patch
more corn and beets
onions, garlic
trellises of cucumbers and beans (before the mobile chicken coops)
hills of melon and squash varieties along the back edge
grapes are back there too
... and Cassie, walking down to feed the chickens

Teens!  I tell ya!  It doesn't matter what species they are, it seems like all they want to do is lounge and laze the day away ;)

Oh yes--- and yesterday, we set ONE more set of eggs in the incubator ;)
Due date:  August 4th

 On the quilty side of things...
Celtic Solstice was loaded and quilting was begun yesterday.  It was another day of taxiing children to-from school, so not much was completed.  Tonight, it won't see any action, either.  We are headed out shortly for Cassie's volleyball league.  Love that sport!

Alrighty---Happy Wednesday everyone !

Monday, July 13, 2015

Smith Mountain Morning - Green [Hours 9 - 12]

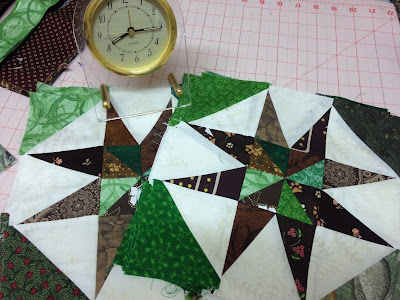
It's mid-July and my passions are pulling me in every old and new direction.  Four more hours of time dedicated to Smith Mountain Morning (greens) were scattered here-n-there this past week

Hr #9:  starting to press the sub-units for the green star blocks

Fifteen years of quilting under my belt;  mistakes still happen :D

Hr #10: green star blocks completed; 1.5" brown and green logs cut for the connector block

Hr #11:  still piecing the connector blocks;  neutral squares added to the green logs

Hr #12: connector blocks 2nd log layer of browns pieced and starting to press
Happy Monday!

DIY - Tumbler quilt pattern template

Last week, I mentioned about being struck with Bonnie's latest Leader-Ender challenge -- Tumblers, and I showed how I made up my own 2" tumbler template.

Per request, here is a simple how-to of making a Tumbler template ANY size you want :)
(the specific pictures are for a 4" (finished) tumbler).

STEP 1:
Using some light-weight cardboard or template plastic, measure out a square of your desired size.
For a 4" finished Tumbler (long-side), pictured here is a 4.5" square.

STEP 2:
Using VERY little math -- determine the size you wish to have for the short side of your tumbler.
Note:  After a little bit of research, I've determined the following:
there is NO magic ratio that is required in order to have a true tumbler 
(heaven knows some quilt-police do exist)
If you happen to know different rules, please share.  Truly.  
I couldn't find any steadfast ratio requirement.
The size of your finished short-size is personal preference!
For this template, I decided to mimic the ratio of my smaller template -- the FINISHED short and long size with be in a 1:2 ratio (2" to 4" for this larger template).
If you wish to change the ratio, the math is SUPER SIMPLE!  Actually---there IS no math;  just measurements.

If you observe closely in the square picture from step #1, I measured in 1" from each side of the top corners, markings made with a pencil.
(For those math minds:  4.5" - 1" from each corner = 2.5" top length -- UNFINSHED;  therefore, 2" finished).

This is where measurements are the ONLY skill needed in making your template.  If this short side is too long or too short for you -- simply make a DIFFERENT measurement from each of the upper corners.
As long as the measurements are identical from both corners, YOUR TEMPLATE WILL WORK!  

 
Template ready for action!


Since I used light-weight cardboard for my template, I used one of my acrylic rulers as my cutting edge with my rotary cutter.  
Q: So, why don't you just buy the tumbler template then, Amy, since you have other rulers?
A: Well -- because I don't need to spend the money on it.  This is the first time I've made a Tumbler quilt and I don't plan on making a lot of them in the future.  Now, the Easy Angle pictured..... oh boy!  LOVE that ruler!  Use it all the time!

Placing the acrylic ruler on top of the template TRULY adds only a second or two;  hardly a nuisance for me.

4.5" squares can be stacked and cut...


4.5" strips can be stacked and cut...

For ANY size tumbler, whether cut with a purchased acrylic ruler or your DIY homemade template, when piecing, the corners need a slight overlap in order for the edges to end up in a straight edge.

Finished sample :D

2" x 4" tumbler

Sunday, July 12, 2015

Propagating Aloe Vera plants (and others...)

Google propagation aloe vera, and you'll read quite often that aloe vera have rhizome root systems and best propagate themselves via these rhizomes rather than leaf cuttings.
I learned this through experience earlier this year. ;)

My aloe vera plants were starting to show some large offshoots (pups), so I set off to re-pot the babies this morning.

Just about every site I read said to cut the dirt with a sharp knife in order to separate the pups from the mother.  Hm.... I didn't.  The entire pot was emptied and the soil was gently loosened to free up the pups from the mother.

A great example of the rhizome root system!  The larger white 'connector' in the picture is the rhizome coming off the mother plants.  You'll see that the mother plant (and pups) have 'normal' roots in addition to the thicker rhizome root.

The pup can simply be snapped free from the mother -- it's best if they have established roots on the pups.  Although, there was one I transplanted today missing roots -- I'll keep an eye on how that one fairs...
  
Another 'fact' stated on most sites describing how to transplant pups say to allow the pups to sit a few days in order for any wounds to scab over.  ...  *shrug* ...  I didn't earlier this year, and they all seemed to do just fine, so.... into the dirt they went.

One thing I HAVE started doing now, though, is washing up any containers I plan to transplant in to. 


From my four established 'mother' plants, three of which were pups from a master-mother earlier this spring, fifteen new lil' aloe vera plants have been started.  LOVE this!!!!  I truly wonder if I missed my calling in life...

 But I wasn't done yet!  No, no.....

They say that plants grow to the size of their containers.  I saw some MAMMOTH aloe plants when out researching different propagation methods, and I'm curious to see if I'll ever be able to have enough (or large enough) plants in order to draw small, yet substantial, amounts of aloe from the leaves to include in some of my lotion bars (I have yet to blog on those!) ;)
So... the house was searched virtually high-n-low for an empty, larger pot.
LOL.  NONE to be found.
But, I spied a larger pot that was currently housing some fallen-leaves from my ever-growing jade plants, which is how you can propagate jade plants ;)
With the aloe vera transplanting finished, I'm excited to see how much larger my mother plant will become.

THEN, I had to do something with the jade leaves that have been growing...
And the Good Lord knows I couldn't stop there.  One of my viney houseplants had been growing like it received a dose of steroids! (I guess it kinda did;  it has been fertilized on-n-off for the past couple of months);  it was given a trim which lead to 8 new transplants...
Some new containers of marjoram, oregano and thyme were planted...


Our older mini-greenhouse's plastic was removed, and it now acts simply as a plant shelving unit in our south-facing window.


Another container of new-to-me herbs was also planted.  I've been reading up on herbal teas;  catnip, lemon verbena (I have to suffice with lemon grass), and chamomile were all highly suggested on a few sites.
Is it crazy to be excited to see all these lil' plants and containers?!!??

NOT to forget all of our tomato plants that are starting to take off in the upper garden :D  I kinda lost count, but.... 75-ish is a good estimate (give or take 4-5).   They were given a couple hours of my attention this morning as well;  weeded, re-leafed, and pruned.

Happy Sunday!

Tuesday, July 7, 2015

Experiment: Infused Beet root in olive oil [Natural Soap Colorant]

Wandering around the gardens this morning, nibbling on a teaser first-pickings of raspberries, I really did my best to ignore some of the rows of plants that were needing my attention for weeding and thinning. 

I've never planted beets before -- I don't like them;  but we had plenty of garden space this year in the lower garden, so we planted a couple of rows for my in-laws. 

......

Alright.  I'll be honest.  I've never TRIED them---but, I dunno.  I think my brain has been wired to an instinctual dislike for them; they have a unique smell, and turn EVERYTHING rosy-red.

*lightbulb*

They turn everything rosy-red!

After a 10 minute power-search on "infusing beet root to color soaps naturally," I knew that beet root POWDER could be used as a natural colorant, but I didn't come up with down-n-dirty DIY tutorial on infusing actual beet roots in oil.
Hm.....
Rather than burning up any more time on the computer, the next half hour was spent thinning out and weeding our two rows of beets.  When they were planted, I took care to place 2-3 seeds together every 2-4 inches;  and wouldn't you know it??  Just about 100% germination occurred!

Thinned beets
The beet-thinnings were rinsed, and my workspace organized...


No measurements were taken, but a small 4 oz. jar was filled about halfway with olive oil, and I had...... a "couple fist-fulls" of beet-thinnings.  That'll have to suffice for the experimental measurements.

The beet roots were trimmed off, and then any amount of bulb and stem that was red was chopped up and placed into the jar of oil.

It didn't take long for me to swap out the small 4 oz. jar for a pint far;  I underestimated the amount of roots and partial-stems I actually had.  Also, of course, hindsight is always 20-20;  as I neared the end of my chopping, I made a "DUH" face, and thought..."why on earth am I trimming the roots off? After all, the researching mentioned beet ROOT powder....", so into the jar they went!

The aftermath:
1/3 pint of chopped beets, topped off with olive oil,
a small bowl of beet leaves that will either be enjoyed by myself or my husband in a salad, or given as a snack to my chickens or pigs,
and a beet-stained cutting board (currently soaking)

At this point, the jar will be covered.  It will either sit out in the sun for a few weeks, given a shake-shake from time to time, with the hopes of infusing some of the color in the oil OR, theoretically, it could be boiled in a hot-water-bath to speed up the process. 
*shrug*
Right now -- it's on the table in the sun :D

Will it naturally color soap?  Is it going to be finicky, therefore I should only use in a rebatch?
Stay tuned!

This whole experiment has given me a bonus to boot:  my beet rows in the garden are thinned AND weeded!

Soaping update

Three week update on my first batch of soap that was then rebatched into this
The color has richened deeeeply into a dark, DARK brown.
The smell remains ABSOLUTELY amazing, but due to the high HIGH amount of Dark Rich Chocolate fragrance added in comparison to the Turkish Mocha, it resembles chocolate more-so, with an underlying mocha.  Did you know that in rebatched soap, you don't need to add as much fragrance as in the initial cold process (CP) soap?  So, yes folks... these bars pack a whopper of smells!!!!!

Two little slivers of edging had been cut off the ends, and being almost three weeks into curing, I jumped into testing the soap out yesterday!
NOTE:  Go EAAAAASY on the coffee grounds, folks!  This most definitely is going to be a soap I keep in the kitchen, which is typically where we wash up after being outside in the garden.  The coffee grounds are an EXCELLENT exfoliating and scrubbing additive!
Recall: 1/4 cup of grounds had been added to the 850g batch

Three week UPDATE on the original FIRST-EVER bar of soap, made by yours truly:  
There were a few things that lead me to rebatching my first soap...
#1)  There was a concerning 'off' odor, almost like spoiled milk, that the bars had.  Uggghers!  {{Come to find out, that odor was nothing to be concerned with.  The one lil' bar I kept no longer had the odor about 2 weeks into curing.}}
#2)  The cuts were horrendous!  Check out the rebatch post to see if you agree!
#3)  Jeni, my soaping MENTOR, dropped off an old 2 lb mold she no longer used AND a small collection of fragrance oils she wasn't interested in.  I mean---hel-LO!  It was like divine intervention!  I HAD to play with a rebatch!!!!!

Anyway---that one lil' bar I kept out of the rebatch has now reached its three-week old birthday.  It was time for a test-run!!!!!
This was a simple recipe of 30% coconut oil and 70% olive oil, with the additive of coffee grounds.
Lathered and bubbled decently;  no burning;  a bit 'drying' sensation about 15 minutes after washing (I've read that high amounts of coconut oil may cause this, therefore suggestions say to keep coconut oil amounts <=30%).
After placing it in the soap holder and picking it back up a minute or two later, there was almost a slime-like appearance to it, but after another 10 minutes of drying, it was back to a muted, solid bar of soap.  

No other soaps have been test-run yet; they (not-so?) patiently await their turn...
Caitlyn's Lemon Energy yogurt soap

Spiced Amber Ale yogurt soap
(with parsley flakes)

Oatmeal & Honey yogurt soap
Ginger Patchouli Oatmeal & Honey yogurt soap

Cherry Explosion yogurt soap
(my first experience of a soap partially gelling -- I'm not a fan)

Monday, July 6, 2015

Smith Mountain Morning - Green [Hours 5- 8]

Plugging away here-n-there on the SMM in greens...

Hr #5: The brown star-points being chain-pieced.

Hr #6: brown HST's pieced & pressed;  the second side of the green star-points being chain-pieced.

Hr #7: all 3.5" subunits for the star blocks assembled.

Delayed taking Hr #8 pic in order to complete the pressing on the 12 brown star blocks

Sunday, July 5, 2015

Siphoned onto the 'Tumbler L/E' bandwagon!

Bonnie's at it again!  She's established a new Leader-Ender (L/E) project for 2015 -- Tumblers.  She's proposed L/E projects in the past, but I've never participated.  Other L/Es have always been underway!  
Mind you, I have a few L/Es underway right now.... Omigosh and RWB 9-patches, but....
I was feeling inspired after catching up on some FB posts this AM.
I don't have a tumbler ruler nor a dresden ruler, but... I have a geometry background and a master's degree in Mathematics.  That should be enough :D

Geometry 101:  if two parallel lines are intersected by a transversal, alternate interior angles will be supplementary.  
Layman's terms:  as long as both transversal cuts are identically symmetrical on opposite sides of a square, units pieced together in an alternating way will result in a straight line (seam.)


So, I grabbed a piece of cardboard (one of those inserts from Hancock's packaged FQs), and cut a 2.5" square.  On the 'top' end of the square, I tapered a cut in 1/2" -- and repeated this on the other upper corner.
Result:  Top dimension (unfinished): 1.5".  Bottom dimension (unfinished): 2.5".

Despite my template being made of cardboard, it isn't rigid enough for a rotary cutter.  Psht!  No biggy!  After pressing four strips together, I simply placed the template atop the strips and then placed one of my smaller rulers along the edge of the template.

It really wasn't all that putzy, nor did it add much additional time.  A few seconds.... minor!

Then, just as if you'd have cut them from a "real" ruler... the corners need to be overlapped ever-so-slightly for accurate piecing...

 and the start of a new L/E project has begun!
And, oh my goodness-----these tumblers (at this size!)-----they're kinda stinkin' cute.

Oh, that Bonnie!!!!!