Showing posts with label Splendidly Marching Along. Show all posts

Sunday, August 21, 2011

Some final touches

Four quilts get 100% COMPLETELY marked off now.


Splendidly Marching Along and Transitions only needed labels to be complete. SMA will be sent to Alycia as soon as Maltese Star gets finished (my next to be loaded on the frame). Transitions will be in the hands of a new owner by the end of this week as she heads off to college.

Hopscotch needed binding; I had LOADS of this burgundy in my 2.5" strip drawer; NO IDEA where it was from???? But, used most of it :0) FINISHED!

Despite having had Roll, Roll Cottonboll marked off as" finished" in May, it still needed binding as well as a label even though it had been living on our bed :0). So, using some yellow and blue 2.5" strips from the drawer....it's FINISHED!

Feels good having those putzy tiny finishing tasks DONE! ;0)

Check
Check
Check
and
Check!


Wednesday, August 10, 2011

Two quilting finishes & DSL troubles

Grrrrrrrr......I didn't realize Blogger was working on an update, so I lost half of this post before saving, and I don't care to type it all up again.

The short version: We were having DSL troubles and no Internet access when I arrived home last night from my parent's house. So, after some trouble-shooting this AM, and a 30-minute tech-service call, and an 11:00 visit from a (cute) technician, and another 3:00 phone call when the DSL wasn't working again, and another 3:30 visit by the technician.........

.....we're up-n-running again.

During the Internet-down-time today, I got busy with some quilting.....

Splendidly Marching Along (61" x 77")

That hour spent Saturday morning to load this quilt paid off, because it was a perfect way to spend much of the morning hours.

Just a simple pieced backing for this quilt.

The quilting was a new pantograph: 3" Hyacinth. I think I hit a jackpot pantograph provider: Urban Elementz out of Texas; I think they have EVERY POSSIBLE pantograph under the sun!! It took me over three hours the other day to really peruse the entire collection before making my selections. This pantograph is meant for 3" sashing, however as an owner of a Juki98, this is a great size (and SIMPLE pantograph) for my short-arm machine.

After a couple more finishes, this one will make its way to Alycia for QOV donations.

Loading time: ~1 hour
Quilting time: ~ 4 hours
Bobbins used: 6
Pantograph: 3" Hyacinth

Transitions (72" x 97")

Transitions was quilted last month, but had been on the waiting pile for binding.

Being on a roll today, I pulled it out to finish it up. This has plans to be gifted to a sweet lil' gal who is heading off to college in a few weeks.

Both quilts need labels yet; on the agenda for tomorrow. In addition, tomorrow also bodes some gardening! I skipped out of the garden today; I haven't been in it since Sunday. Oh dear---those cucumbers might be overflowing by now.

Sunday, July 24, 2011

Some purchases & Stash Report

Yesterday afternoon (Saturday), I left for my parent's place to drop the girls off for a week of Vacation Bible School at my parent's church. This is the 4th year for Cassie to attend "Grandma's VBS" and the 3rd for both Caitlyn and Candace. They enjoy it. Last year it worked out perfectly because I was holding a Volleyball camp during the VBS week, so my "babysitting" was covered. However, THIS year.....with no volleyball, I really have the ENTIRE week open to myself ALLLLL DAY. I SHOULD head in to school one of the days and do some preliminary work for the upcoming school year.........**sigh**.......we'll see. I'm still not ready to get into school-mode yet. I'm having a hard time getting "happy" for the upcoming year; with all the changes and uncertainties that are happening in Wisconsin....and all the changes that are in effect in our 7-12 wing alone.......**sigh**.......{{keeping my smile on}}.....I just don't want to get into school-mode until I ABSOLUTELY have to.

On the way back home today, when I typically turn off on the only exit of my trip to head home, rather, I decided to head into the town of Eau Claire instead. I knew there was a JoAnn's at the other end of town, and I wasn't in any hurry........

I never had been at this JoAnn's before; the fabric section was QUITE a disaster and rather untidy, BUT I really didn't care, nor am complaining. I just browsed around, not really looking for anything in particular except some bleached muslin. I had a roll in my hands and was going to request 10 yards of it (at a price of $2.99), however, when I turned down one aisle, I came across a section of muslin by the bolt, so I snatched up a 15 yard bolt for $29.99.

The Patriotic fabrics were all 50% off; too many of them weren't appealing; quite "scratchy" feeling, but there was this light bolt with tiny flag-like images on it that felt really nice-n-soft. I took the rest of the bolt (5 1/8 yds) @ $1.99/yard sale. CAN'T really beat that price. This black-on-black fabric was also calling to me; the price showed $5.99/yard. I normally don't buy ANY fabric at the listed price (ALWAYS a sales shopper here), but I really liked it. So, I requested the rest of that bolt too (5 5/8 yds), and as she printed out the price tag, she said "at $3.99 a yard." Hmmm???? I wonder if there was a sale that I didn't know about??? I also had the thought go through my head that maybe they offer an "end-of-bolt" incentive that I know some quilt shops do???? Anyway----at $3.99 a yard....I was quite pleased on the fabric.

As I was puttering around some more, this lady approached me, said something.......and it took me a moment to register what it was. She was handing me a coupon for $5.00 off a $35 or more purchase........she had said "Coupon?". What a kind thing to do!!!! She shrugged and said that nothing was jumping out at her, and obviously I had found some goodies, so she wanted to see it useful for someone.

SO.....the final damage was:
15 yards muslin
5 1/8 cream QOV fabric
5 5/8 black-on-black
for a total of 25 3/4 yards that will be included in today's stash report.

The book shown in the picture was given to me by my mother; she found it at her Goodwill store. "Quilts from Aunt Amy."

In addition to the fabric purchased, this week's report includes fabric used in my Splendidly Marching Along quilt. Before leaving for my parents, I started piecing a backing. Some more width is needed before I can load this onto the frame.

Stash Report: July 11 - 24
Used/wk: 8.75 yds
Purch/wk: 25.75 yds

Used/yr: 131.375 yds
Purch/yr: 81.917 yds

Net Used: 49.458 yds

Friday, July 22, 2011

Splendidly Marching Along [instructions]

This quilt is created using 2" strips from my RWB scrap bin. Total yardage is not given because I didn't want, nor need, to figure it out. I just kept piecing, pressing, cutting, counting......repeated as needed ;0)

Since these are from the scrap bin, I needed to be sure my strip lengths surpassed 17" when I needed to cut the larger QSTs (quarter-square-triangles), and surpassed 6" if I only needed to cut HSTs (half-square-triangles). Pictures to some shortly explaining these requirements.

Creating the Strip-Sets
Sew two blue strips, one to each side of a white strip. Press towards the blue. Repeat using two red strips and one white. Press towards the red.

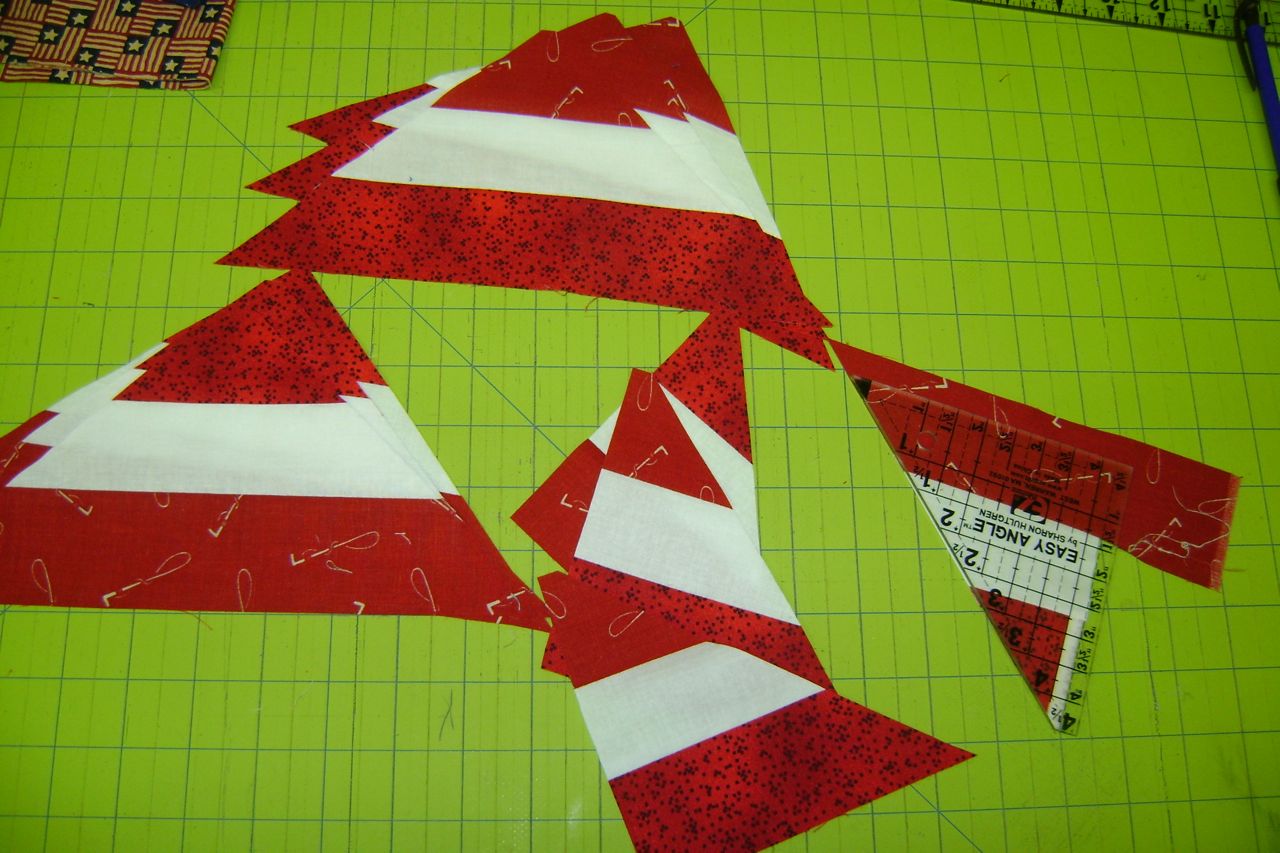
I used the Easy Angle ruler (for HSTs) and the Companion ruler (for QSTs). The Easy Angle ruler I have is the smaller 4.5" version, so I needed to eyeball up a small part of the cut. Notice the location of the upper "notch".

To note: When I was playing the other day with intentions of only using the Companion ruler, I didn't want these corner ends to be wasted; that's why the Easy Angle ruler was used, which led to the creation of the secondary block in this quilt.

Once the HST is cut with the Easy Angle ruler, switch over to the Companion ruler for the QST cuts.

As you near the end of your strip set, again you will be using the Easy Angle ruler to cut off the "ending" HST unit. Again, notice the placement of the "notch". If you have a larger Easy Angle ruler, you'll simply be able to line up normally with (roughly) the 5" mark.

Now....HERE is part of the minimum length requirement business. From a 17" strip set, you will be able to cut two (2) HST units and two (2) QST units.

I TRIED shorter strip sets where I was only able to get one (1) QST unit, thinking...."no biggy! I'll just cut the extra down to HSTs." {{see where the QST was cut?}} Well folks......this creates a mirror-image HST, which simply didn't work with the rest of the HSTs.

No matter which way I turned the "mirror" HST, it didn't work. Now, by all means, if you plan to cut a bunch of "mirror" HSTs, then maybe you'll play around and get something to work. But from this point on, I only cut EVEN numbers of QSTs from each strip set.

If I didn't have enough left in the stripset for an EVEN number of QSTs, I grabbed the Easy Angle to cut as many HSTs as I could from the remaining set.

The absolute shortest strip-set I used was at least 6" which allowed me to cut two (2) HST units, so don't rule everything out if it's less than 17" in length.

On the other extreme; if you use a full WOF strip set, you should be able to get six (6) QST cuts and three (3) {{MAYBE 4}} HST cuts. Notice that I was JUST shy of getting a 4th HST from this strip set.


Number of units needed

The 5x7 layout I made needed the following units:
- HST units (Easy Angle ruler cut) needed: 36 each in red & blue
- QST units (Companion ruler cut) needed: 34 each in red & blue
In addition, you will need to cut the following from your white...
- 2" x 6.5" rectangles: 36
- 2" x 9.5" rectangles: 36

Starting with the QST units, I set all 34 reds and blues as pictured and chain-sewed the entire stack. Once finished; I pressed towards the blue units.

Then I split the pile in half (as pictured) and chain-sewed these into the 17 "hourglass" blocks. Press and trim (as needed) to 9.5".

Then came time to chain-sew the 36 HST units. I set all reds and blues as pictured and sewed through the entire stack. I pressed towards the blue units.

Split the pile in half (as pictured) and chain-sew these into the 18 "bordered-pinwheel" blocks. Press and trim to 6.5".

Using my Easy Square Jr. made easy-n-quick work of trimming. The center 45 degree lines should match up quite nicely with the seams in the block for you. I trimmed on two sides, then rotated the block to trim the other two sides.


Using the 2"x6.5" rectangle units, attach one to each side of the 6.5" pinwheel blocks. Press towards the white border units.

Using the 2"x9.5" rectangle units, attach one to each the top/bottom of the pinwheel blocks, pressing again to the white border units.

I choose to create a 5x7 layout, alternating the blocks so that each corner consisted of a lighter "bordered pinwheel" block. I also took care to make sure my hourglass blocks alternated row-to-row to create these larger blue and red "on-point-looking" diagonal squares (diamonds).

For the inner border, I cut 2" strips of this checkered red/white fabric. First cutting and piecing lengths for the sides, and then again for the top/bottom. If sewn perfectly without any stretch, the two sides should measure 2"x63.5", and the top/bottom should be 2"x49.5".

The final outer border I added was of some Americana fabrics; and hindsight is screaming at me...."TOOOOO BUSY!" But, the borders are cut and sewn and won't be coming off. The fabric was cut about 6.5" both along the length and WOF in order to keep the directional aspect of the fabric. My final quilt top measures 61" x 78".

This quilt has Alycia's name on it for her QOV projects!

Wednesday, July 20, 2011

We grew fins today

Yup....the heat was too much again today! I think we're almost sunned-out now; and thankfully the humidity is scheduled to break a bit tonight!

I spent about 30 minutes doing a swim workout, though, since I haven't run since Saturday night. I had to do SOMETHING because I'm feeling a wee bit guilty for using the heat as an excuse not to run. However, tomorrow morning, no excuses.

Also, before heading out (when the girls were in summer school), I managed to finish piecing Splendidly Marching Along, but the pics are still in the camera. Tomorrow.....

Splendidly Marching Along

With all of our activity here-n-there lately, I simply made yesterday a Stay-At-Home-and-Relax-with-Movies day once summer school ended. Therefore, while the girls were watching movies in the afternoon, I made more progress on my Splendidly Marching Along blocks.

Enough units were made to create a 5x7 layout of the 9" blocks; that'd be 34 quarter-square-triangle units in each red and blue for the 17 "hour-glass" blocks; and 36 half-square triangle units in each red and blue for the 18 "light-bordered" blocks.

Naturally, there was some trimming involved with the smaller "light bordered" blocks...

This was the status of the quilt when I turned everything off for the evening of relaxing with my iPod Kindle book. A secondary pattern emerged when the top was pieced together. Borders are yet to be determined; the quilt center measures roughly 45"x63".

Thursday, July 14, 2011

More Morning Midgets & some strip play [Rainbow Scrap Challenge]

Okay....don't laugh!
If you read my post yesterday, I said that I ran 6 miles Tuesday morning (tired, but felt alright) and then, for my day off of running, I power-walked 4 miles yesterday (yeah, with that true power-walk gait). Well....did you realize there is a difference in muscle use when running versus when power-walking??

OMGoodness! A tendon at the back of my left knee is KILLING me!!! I even have a little gimpy walk right now because I can't fully straighten my leg :0( Therefore.....there was NO RUNNING for me this AM. HOWEVER, tomorrow---no excuses! I simply must get my speed workout in once I drop the girls off in the morning. A little ibuprofin will help me out if needed :0)

Therefore...after dropping the girls off this morning, I was jetting my way back home right away. It was a dreary, overcast, COOL day out, so I perked up another pot of coffee and then headed downstairs for another morning of Midget Madness.

I finished up Block #16: Christmas Tree

and then came Block #17: Airplane

and Block #18: New Album with some fussy-cutting

and Block #19: Crow's Nest


and....ummm.....WHOA!!!!!! Holy buckets! Who ever designed this baby???!?!? I simply didn't have the heart to start it with only 30 minutes left before needing to pick the girls up. So, I left a bit early and visited with a few students and teachers while waiting for the girls.

The afternoon consisted of taking Shadow to the vet (5 yr old Black Lab) and working in the garden. During dinner, I announced to Paul that I did NOT plan to head back outside after dinner; I wanted to spend some time downstairs.

And despite having this on my design wall

and this on the quilting frame

and these waiting on the side for borders and backing
(sound familiar Angela??!??!) ;0)


Instead.....THIS box of RWB scraps were itching to be organized and made into something for Angela's July Rainbow Scrap Challenge

I actually had a Quick Quilts pattern all set to try out that called for 2.5" strips. Hmmm.......I really didn't have that many in my RWB box; instead, I had loads of 2" strips. So.....ho-hum...ho-hum.......wonder what would happen if I strip them up a bit....


and then grab a couple of specialty rulers.....the Companion to make some QST units and the Easy Angle for some HST units (and to eliminate as much waste as possible)...


A little arrangement here....

a little arrangement there....


laying out the blocks for a view of what can be obtained with an hour of putzing. Two cute blocks; the larger 9.5" unfinished, and the smaller 6.5" (trimmed up) unfinished. Thoughts of having the larger blocks in the center, and maybe the smaller blocks as border units? Or backing units???

And then....another designing lightbulb hit.......grabbing some 2" white strips.....

LOOK at how nicely the two play together now!!!!!! LOVE IT! Now......hmmmmmm......a name for this design?

Hope your quilting and summer endeavors are splendidly marching along :0)

OH! Gosh.....maybe that's the name???? "Splendidly Marching Along"